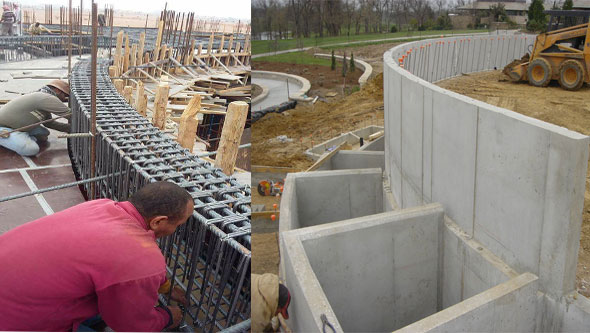
Construction Process of a curved concrete retaining wall
- Concrete Cost Estimator
- Concrete Continuous Footing
- Landscape Bidding and Estimating
- Construction Cost Estimating
- Concrete and steel cost estimation
- Construction Cost Estimate Breakdown
- Construction Estimating Worksheet
- Home Construction Cost Estimate
- Estimate Pricing Sheet
- Sheet for General Contractor
- Construction Cost Estimate
- Labor Materials Cost Estimator
- Masonry Estimating Sheet
- Sheet for Building Contractor
- Construction Schedule Bar chart
- General Cost Estimator Sheet
- General Construction Estimate
- Building and Road Estimating Sheet
- Detailed expense estimates
- Door and Window Takeoff Sheet
- General Construction Cost Estimating Sheet

The purpose of the concrete retaining wall is to retain soil that remains on an elevated and sloping area.
A concrete retaining wall is generally constructed with solid concrete, but cinder blocks can also be used to get rid of expensive masonry work, specifically when it has to curve. Given below, some useful guidelines to construct a retaining wall with a curve on your own effort.
Step 1 – Arrange the Area
The concrete retaining wall should be set up in a trench. Demarcate the area with stakes, and then attach a string among them. Calculate the length of the staked off area and specify the height of the concrete retaining wall according to your choice. Based on these numbers, buy the amount of cinder blocks to fulfill your need. Calculate the width of the blocks, and then complete the task for demarcation of your area by staking off the width and then finishing the length for a 3D representation.
Carefully, examine the staked out area and eliminate any detectable rocks, weeds and even roots. Excavate the area to a depth of 6 inches, eliminate rocks and other debris as necessary.
Tamp the site down, and verify the depth. Make modification as required. Put down a single layer of gravel, and then tamp it down unless it becomes even and level.
Step 2 – Place Blocks
Also Read: How to make an effective Retaining Wall Design
As soon as the trench is cleansed and excavated, the blocks should be arranged accordingly. Set the first block in the trench, ensure it is firm against the sides. Also verify to maintain proper level. If it is not, softly hit it with the mallet unless it becomes level. Arrange the next block, and reiterate the method unless the first level of cinder blocks remain in proper position.
Step 3 – Make Cuts
As the concrete retaining wall is constructed on a curve, it is required to alter the cinder blocks to accommodate the curve. The string will act as guide to verify where the curves occur and how far your block is sticking out. With the help of a marker, track the curvature of the string on the block. Detach the block from the trench.
Take on your work gloves and goggles. A masonry saw can be used to trim the block to the desired size you require for extreme curves. To deal with mild curves, employ a mallet and chisel. Go on with your desired effect and substitute the block.
Step 4 – Strengthen the Foundation
Backfill the area, where the retaining wall is situated, unless the earth is firmly packed around the base. Pour gravel into the centers of the block so that it is halfway up. Arrange the second level of blocks, ensure that they are level and match up with the blocks underneath. Cut them to adapt as required, and fill them with gravel. Repeat the process unless the desired height is attained, and then cap off the blocks.

- Application of concrete calculator
- Roofing Calculator can streamline the roof estimating process
- House construction cost calculator
- Engineering column design excel spreadsheet
- Material Estimating Sheet with Excel
- Materials List and Cost Estimate Worksheet
- Concrete Slab Estimating Calculator Sheet
- Common types of foundations for buildings
- Online calculation of construction materials
- Estimating with Excel for the Small Contractor
- Concrete Beam Design Spreadsheet
- Virtual Construction Management app for construction
- Autodesk’s Project Skyscraper
- Reed Construction’s Reed Insight
- Manage your construction project documentation
- Costimator, the popular cost estimating software
- On Center Software for construction professionals
- Free Construction Estimating Software
- Plumbing Calc Pro
- Cost Estimate Worksheet
- HVAC Piping Quantity Takeoff Worksheet
- Construction Estimating Software Sheet
- Estimate Cost Templates
- Construction Punch List
- Construction cost estimating template consisting estimating basic
- Gantt Chart Template for Excel
- Download Civil Engineering Spreadsheets with Verification
- The Building Advisor Estimating and Budgeting Worksheet
- Spreadsheet for design of concrete bridge
- Construction Estimating Software Free


