


Most recognized 3D printing plugins for sketchup
An exclusive article by Matt Donley - Owner of www.mastersketchup.com
Sketchup is a great tool for creating models for 3D printing. I recently built my own 3D printer and have been learning a lot about how to design printable models in Sketchup. These are the 3 plugins I can’t live without when modeling things for my printer.
NOTE: Depending upon which version of Sketchup you have on your computer, there are different methods of installing plugins. With Sketchup Make & Sketchup Pro 2013, they introduced the Sketchup extension warehouse which makes installing plugins much easier than before. The only problem is that they don’t have ALL of the plugins available. Some of the plugins I recommend below are not available through the extension warehouse, and must be downloaded from the Sketchucation forum. If you don’t have Sketchup 2013 or you are trying to install one of the plugins not hosted on the extension warehouse, I recommend checking out Installing the Sketchup STL Exporter Plugin for details on how to install these types of plugins.
Solid Inspector
Plugin Name |
Solid Inspector |
Author |
ThomThom |
Description |
Checks groups and components for missing faces, highlights problem areas |
Compatibility |
Mac/Windows |
Requirements |
TT_Lib² Install from extension warehouse |
Download |
Download Solid Inspector Install from extension warehouse |
One of the requirements for printing out a 3D model is that it has to be completely solid, or “water tight”. Despite our best efforts, there are many times when we unintentionally have a hole in our model that needs to be fixed. In other words, there is a face missing between some of the edges in our model. Things can also get screwed up if we have extra faces or edges on the interior of our model.
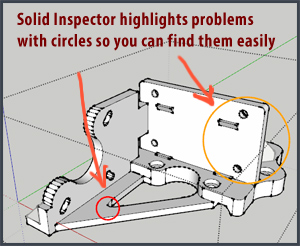
If it’s a really tiny face, you can get frustrated pretty quickly trying to find it. That’s where the Solid Inspector comes in. The Solid Inspector quickly indicates where there are holes in your model, so you can manually fix them before exporting your model to be printed.
The Solid Inspector plugin was created by ThomThom, and is available in the Sketchup extension warehouse. This plugin requires the installation of TT_Lib², a library of functions shared between different plugins by ThomThom. If you have Sketchup 2013, open up the extension warehouse and search for “Solid Inspector”. Click install. Also search for and install the library “TT_Lib”.
One thing that’s nice about this plugin is that it doesn’t add any additional clutter to your toolbars. Instead, you click on the “Tools” menu, and select “Solid Inspector” to activate it. The cursor will turn white, and you just click on the group or component you’d like to check. You might even want to create a custom keyboard shortcut for this tool. I set mine up so it activates when I press SHIFT + S.
If there are any missing faces on that object, a red circle will appear around the area that needs repair. You can then easily identify the problem area and zoom in to fix it. Pressing Tab will zoom in.
This one plugin has saved me a ton of time. You won’t realize how handy it is until you try to export a file that gives you an error. Try finding the error without using Solid Insprector and you’re sure to get frustrated really fast.
RoundCorner
Plugin Name |
RoundCorner |
Author |
Fredo6 |
Description |
Allows you to select faces and edges to automate the process of rounding sharp corners. You have control over many parameters of the corner, including the radius and segments. This plugin makes quick work of rounding edges of objects you're about to print. |
Compatibility |
Mac/Windows |
Requirements |
LibFredo6 5.0c Download Page (Requires login to Sketchucation) Direct Download .rbz Install via Window -> Preferences -> Extensions |
Download |
RoundCorner Download Page(Requires login to Sketchucation) Direct Download .rbz Install via Window -> Preferences -> Extensions |
Manual |
RoundCorner Manual (Requires login to Sketchucation) |
When I create objects to print, I like to get rid of the sharp corners. You can do this manually using the arc tool and the follow me tool, but the RoundCorner plugin by Fredo is much easier and faster. Using this plugin, you can quickly select the edges you’d like to round off. You even have full control over the parameters including the radius of the curve, the number of segments in the curve, and the type of corner you want to make. It’s not limited to round corners, you can also make chamfered or sharp corners as well.
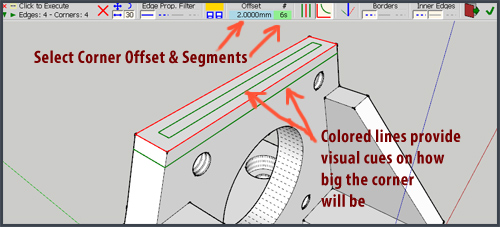
When you install the plugin, you’ll want to add the toolbar to your workspace so you can quickly access it. To use the plugin, click one of the buttons (each button represents a different type of corner). You’ll see a menu pop up where you can change all the parameters of the corner. The most important one to worry about is the Offset, and the Segments. This will determine the radius of the corner, and the number of segments that make up the corner. The larger the radius, the higher number of segments you’ll want so the corner prints out smooth.
You’ll also notice the cursor changes. When you click on entities in your model, there are some different colored lines appear on the faces where you’ve made your selection. These lines represent where the curve is going to take place. By selecting different parts of your model, you’ll get a visual clue as to how it will affect the faces and edges. To execute the tool, click the green check mark, or click anywhere in empty workspace.
In my workflow, I always try to work with square edges until the very end. It just makes it so much easier to modify shapes when they are not rounded. I would recommend taking your model to it’s final design, saving a copy as is, then use this plugin to round off anything. If you find that you need to make changes down the road, it’s usually much easier to revert back to your saved copy and “re-round” the corners than it is to try to manipulate edges that have been rounded.
STL Import/Export
Plugin Name |
Sketchup STL |
Author |
Jim Foltz, Nathan Bromham, Konrad Shroeder, & the Sketchup Team |
Description |
Import and Export STL files. STL files are used universally in 3D printing, so having this ability is essential. |
Compatibility |
Mac/Windows |
Requirements |
None |
Download |
Download Sketchup STL Install from the Sketchup Extension Warehouse |
This one is pretty much mandatory if you’re going to be creating models for 3D printing. STL is the universal 3D file format recognized by most software that is used by 3D printers. This plugin allows you to import and export STL files. So you can easily download STL files from sites like Thingiverse, make changes to them in Sketchup, then export the final model as an STL so you can print it.
One thing I’ve noticed about STL files imported from other 3D modeling software; You’re going to see a lot of extra edges that you don’t need. Sometimes there will be extra edges that subdivide faces that aren’t necessary. For your own sanity, you might want to clean up any extra edges, or soften them by using the erase tool while holding ctrl.
Some STL files will have complete faces missing that you’ll have to clean up, which is why the Solid Inspector plugin is so helpful for finding those small holes in your model that are hard to find.
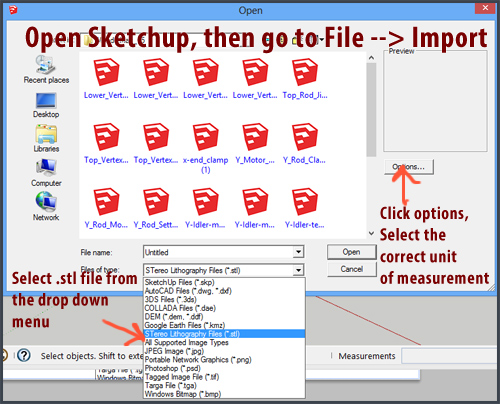
Remember that once you have this plugin installed, you can’t open STL files directly. You must open Sketchup first, then go to File –> Import, then select “STereo Lithography Files” from the filetype drop down menu, then select your STL file to import. Don’t forget to click on options, and make sure “merge coplanar faces” is checked, and select the correct unit of measurements of the file import. (On Thingiverse, I’ve found most model units will be in Millimeters).
To export an STL, (Make sure you’ve checked your model using the Solid Inspector plugin first), Select the object you’d like to export, then go to File –> Export STL. If you don’t pre-select an object, it will ask you if you want to export the entire model. You then select the unit of measurement, then click ok. You can then bring your STL file into your printing software for further processing.
- Profile Builder (Pro)
- Sketchup vray tutorials
- SteelSketch for sketchup
- 3d Sketchup Render Section
- 2015 Click-Change Plugin
- V-Ray 2.0 for Sketchup
- 3d sketchup components of plants
- Revizto 3.0 for Sketchup
- Modelur for sketchup
- Animation in Sketchup
- Sketchup parametric urban design
- SimLab 3D PDF exporter 3.1
- Sketchup full frame wood 2.0
- Easysketch Sketchup Plugin
- Instant Roof Nui Plugin
- Scene Generator Plugin
- Maxwell Render Suite 3
- SketchUp Instant Wall Plugin
- LightUp version 3.3
- Curtain Wall Plugin
- Instant Fence and Railing Plugin
- Plug-in Raylectron v3
- SimLab SketchUp exporter
- Tilelook Sketchp Plugin
- Solar Energy Design Plugin
- IES VE SketchUp plugin
- DropGC plugin for Sketchup
- Vue Exporter Plugin V10.0
- MoveAlong 1.0 for SketchUp
- [Re]Scene plugin
- 3D Tree Maker v1.10.07
- LightUp for SketchUp
- Advanced Camera Tools for SketchUp
- TIG-PointUp Plugin
- Outdoor-stair Plugin
- CutNFill Plugin for Sketchup
- [SU]Ch plugin for sketchup
