Construction Process Of Plinth Beam
- Concrete Cost Estimator
- Concrete Continuous Footing
- Landscape Bidding and Estimating
- Construction Cost Estimating
- Concrete and steel cost estimation
- Construction Cost Estimate Breakdown
- Construction Estimating Worksheet
- Home Construction Cost Estimate
- Estimate Pricing Sheet
- Sheet for General Contractor
- Construction Cost Estimate
- Labor Materials Cost Estimator
- Masonry Estimating Sheet
- Sheet for Building Contractor
- Construction Schedule Bar chart
- General Cost Estimator Sheet
- General Construction Estimate
- Building and Road Estimating Sheet
- Detailed expense estimates
- Door and Window Takeoff Sheet
- General Construction Cost Estimating Sheet

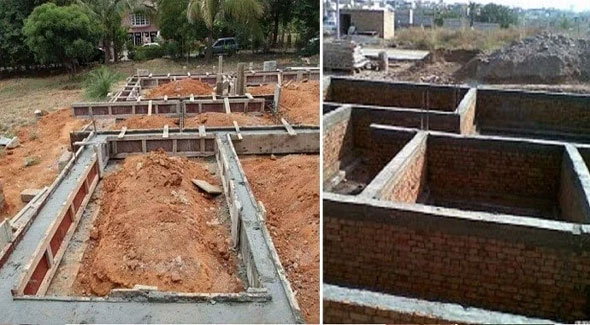
Plinth beam stands for the horizontal cement beam over the boundary of any house. It is placed on top of foundation.
Plinth beam is arranged so that any crack can’t be expanded from the foundation into the wall above when the foundation undergoes settlement. Plinth beams allocate the load of the wall over the foundation homogeneously.
The plinth beams are constructed for the following purposes :-
1. Resist seepage of water into foundation
2. Allow support for the walls
3. Retain the house unitedly
Given below, the details about the elementary process to construct a plinth beam :-
Mark-up width – Generally, width of plinth remains half that of the foundation. In such a situation, foundation is about 45 cm wide and as a result the plinth is 23 cm aligning with the exterior edge of the foundation. Inside 23 cm of foundation integrated with the floor level of the house.
Settle the steel beam – The beams are considered as the major parts of the plinth beam. Beams contain a loop each 16 cm that retains it unitedly.
Arrange Reinforcement – Prior to pour concrete, reinforcement should be set to produce rectangular shape to the beam.
Also Read: Plinth Beam Design Concept
For this purpose, lots of effort are required since planks should be nailed perfectly in exact position and as soon as the concrete is poured the planks should be detached.
Pouring of concrete – While pouring concrete, mason should make sure that the concrete circulates uniformly and smoothens out any edge.
Besides, make sure that the height of the beam is constant all through the boundary.
Remove reinforcement – The concrete becomes solid within 24 hour and final step is to detach the planks retaining the beam undivided.

- Application of concrete calculator
- Roofing Calculator can streamline the roof estimating process
- House construction cost calculator
- Engineering column design excel spreadsheet
- Material Estimating Sheet with Excel
- Materials List and Cost Estimate Worksheet
- Concrete Slab Estimating Calculator Sheet
- Common types of foundations for buildings
- Online calculation of construction materials
- Estimating with Excel for the Small Contractor
- Concrete Beam Design Spreadsheet
- Virtual Construction Management app for construction
- Autodesk’s Project Skyscraper
- Reed Construction’s Reed Insight
- Manage your construction project documentation
- Costimator, the popular cost estimating software
- On Center Software for construction professionals
- Free Construction Estimating Software
- Plumbing Calc Pro
- Cost Estimate Worksheet
- HVAC Piping Quantity Takeoff Worksheet
- Construction Estimating Software Sheet
- Estimate Cost Templates
- Construction Punch List
- Construction cost estimating template consisting estimating basic
- Gantt Chart Template for Excel
- Download Civil Engineering Spreadsheets with Verification
- The Building Advisor Estimating and Budgeting Worksheet
- Spreadsheet for design of concrete bridge
- Construction Estimating Software Free


